You need to have a basic structure of the catalog before you can start adding products to it. Categories are always created first and then the products are added into these categories.
Every product should be assigned to at least one category. If the need arises you can also create the categories on the go while creating a product in adobe commerce.
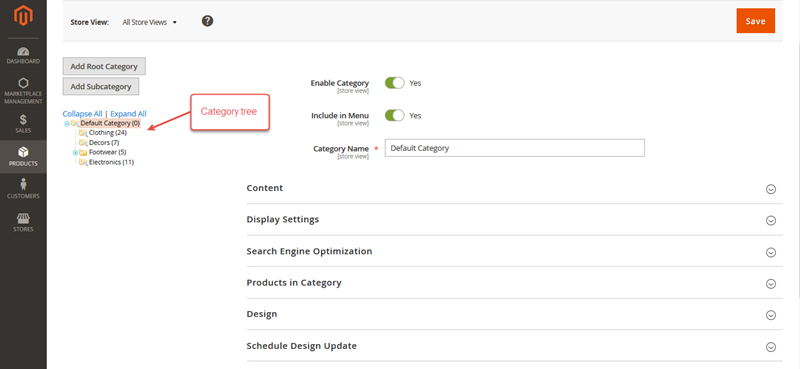
The category structure of your catalog is represented just like an upside-down tree, with its root at the top. Each section of the tree can be expanded and collapsed. if there are any hidden or disabled categories then they will be grayed out.
Each category has an ID number in parenthesis after the category name at the top of the page. The very first category below the root is the one that appears as an option in the main menu. Below that, you can have as many additional subcategories as you need.
Basic Steps to Create Categories in Magento2:
- Login to the Admin’s panel.
- Enable the Category.
- Enable Include in Menu.
- Enter Category Name.
- Complete the Content.
- Complete the Display Settings.
- Complete the Search Engine Optimization.
- Complete the Products In Category.
- Complete the Design.
- Complete the Schedule Design Update.
Step 1 –
- Login to the admin’s panel and tap on the ‘Products‘. Then, under Inventory, choose Categories as per the below snapshot.

After clicking the Categories option in the above step, a new page opens up. Here you will find various control fields namely – Add Root category(Creates a new root category),
Add SubCategory(Adds a subcategory below the current category or subcategory), Expand All / Collapse All(Either collapses or expands the category tree), and a Save(Saves any changes made to the category) button.
If you are starting without any data from the beginning, then there might be only two categories in the list; ‘Default Category‘, which is the root category, and maybe an ‘Example Category‘.
- To add a new root category click the ‘Add Root Category‘ option or if you want to add a new ‘SubCategory‘ for the existing category click the ‘Add SubCategory‘ then first select the root category from the existing list and click the Add subcategory button.

Step 2 –
After clicking the ‘Add Subcategory‘, you need to set up the following parameters –
- Enable category – Set “Yes” to enable this subcategory.
Step 3 –
- Include In Menu – Set “Yes” to show in the menu.
Step 4 –
- Category Name – Set the ‘Name’ for this category.
Step 5 –
Complete the Content –
- Upload a category image.
- Enter a description of the category is created.
- Set the CMS Block to the static block that you want to appear on the category page.
Step 6 –
Complete the Display Settings –
- Select the display mode to – Products Only, Static Block Only, or Static Block and Products.
- If you want this category page to display the “Filter by Attribute” section of layered navigation, set Anchor to “Yes.”
- Set the Available Product Listing Sort By – Set the available product listing sort according to Position, Product name, or Price.
- Set the Default Product Listing Sort By – Set the default product listing sort according to Position, Product name, or Price.
- Set the Layered Navigation Price Step – Use the configuration settings or set the price step for layered navigation.
Step 7 –
Complete the Search Engine Optimization –
- URL Key – If you want to take benefit of SEO, you can fill your own URL key or it will automatically generate based on the category name.
- Meta Title – Write the SEO title of this category.
- Meta Keywords – Add Keywords for this category.
- Meta Description – Write an SEO description of this category.
Step 8 –
Complete the Products In category –
- This tab is used to display products that you want to display in this current category. Select the products that you want to add to the current category from the list.
Step 9 –
- Lastly, click the Save button on the top of the page to save all the settings for this new subcategory.
On the Frontend of the Magento2 Store, you will be able to see the newly created subcategory as shown below in the snapshot.

Support
That’s all for How to Create Categories in Magento2(Adobe Commerce) still have any issues feel free to add a ticket and let us know your views to make the module better contact us.


Be the first to comment.